Recommenced Gear
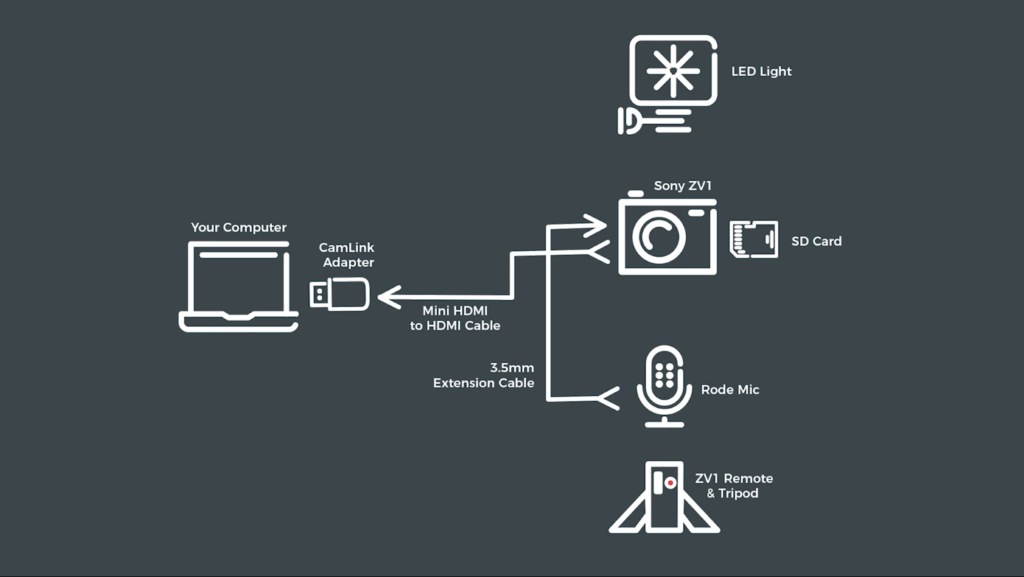
The desktop setup we recommend includes three main pieces: a camera, a microphone, and a light source. You can refer to this map as you move through the guide:

Camera
Our agency founder, Bear, uses a Sony ZV1 for all of his video meetings. It’s a sleek, user-friendly camera – not a chunky dSLR with five different lenses.
At about $750, the Sony ZV1 is a top-of-the-line “point and shoot” camera, specifically designed for content creators and vlog enthusiasts. Bear loves the ZV1 for its impressive focal zoom range, auto-focus capabilities, background blur feature, and handy remote control. Check out the Sony ZV1 here.
You can plug the camera into your desktop using the HDMI cable it comes with, along with a cam link USB adapter. You want to invest in a good cam link to ensure strong broadcast quality – here’s Bear’s pick.
Desk Mount
Using a desk mount like this one, it’s easy to set up your camera so that is facing you, ready to go when you need it but never in your way.
Microphone
Bear uses a microphone from Røde, a tried-and-true brand in the audio recording world. He recommends the VideoMicro Compact Microphone, one of Røde’s cheaper microphones at a price of about $55. The VideoMicro Compact provides clear, professional-grade voice recording on a budget. Check it out here.
Bear recommends mounting the Røde mic to the small tripod which the Sony ZV1 camera came with (since the camera’s on the desk mount.) Set the tripod behind your keyboard, so that the microphone is in good proximity to your mouth. Installed on the tripod is a small camera remote with record and zoom buttons, so with this set up, you can control your camera right at your fingertips! Plug your microphone into the camera and you’re ready to go.
Lighting
Lastly, you’ll want to purchase a dimmable video light. They’re very affordable and make a huge difference in the quality of your picture. Here’s the kind Bear uses. These lights plug into a regular outlet, and come with a mount to tuck behind your desk.
Bear uses zip ties to attach the light’s dimmer remote to the desk mount, and to attach the camera and microphone cords snug to the desk mount.
There you have it. You’ve got a powerful little camera mounted and ready to record, a slick microphone on a tripod that contains camera controls, and a game-changing light source – all on a budget.
Some other useful gear:
We hope these tips guide you as you turn your office into a mini studio! Any questions or comments? Reach us at hello@unify-agency.com.
Ready to chat about your gear?
Book a discovery call today!